Neon X360 Manual
Controller 3: Psychedelia and Boingy
The next controller deals with certain elements that are placed in the scene to add to the overall dynamic of the scene - specifically, two elements that I call "Boingy" and "Psychedelia". Normally these elements are purely audio-driven, but with controller 3 you can take them over and control their motion, shape and colour yourself.
Let's start with Boingy. Make sure that there are three controllers plugged in (and switched on, if you are using wireless pads). As usual you'll need to take over from the auto effect change behaviour, so put the visualiser full-screen and navigate to this effect in the matrix:
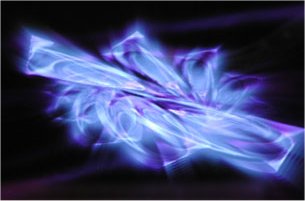
This isn't the effect we're going to practice Boingy on but it's clearer in the pictures in the matrix map - so go there, and then press Up on the d-pad to go to the effect directly above. You should see an effect with a V-shaped tunnel with walls that look like ripply glass, and a flower-like object with 8-way symmetry that is overlaid on the tunnel. That object is what we call Boingy.
Basically Boingy is a membrane surface that you can control. It's a bit like a rubber sheet, and as you move it around, it reacts in a springy, boingy kind of a way - hence the name .
If possible use a nice gentle piece of music to practice to, so that Boingy is mostly in a small flower-shape in the middle of the effect. I've got some Tangerine Dream playing through Neon right now as I'm making these notes, and it's just lovely. Then pick up controller 3, and gently move the left analog stick left and right. You should see the Boingy surface moving in response to your positional commands. Note that in this effect Boingy is in 8-way symmetry mode, so you'll see your actions mirrored in all 8 parts of Boingy.
Notice that if you hold the stick right over to the left or right, eventually Boingy comes up against a limit and stops. This is so that you can't tug it all the way off the screen .
By now you've probably guessed that the left analog stick gives positional information to Boingy, and you'd be absolutely right. Have a little practice with it, using up and down as well as left and right, and see how it responds. One skill you'll have to master here is learning how to "find yourself" in Boingy - note that there are eight pieces of Boingy in this effect, and only one of those pieces is moving in the same direction you're pointing the left analog stick. The rest of them are mirror images of your own. You'll have to observe the motions and work out for yourself which way things will go when you move the stick. I could have done something to make it obvious which piece was yours - by providing a cursor, or by highlighting your piece of Boingy in a different colour - but to do that would have broken the symmetry of the pattern, so I didn't. You'll just have to learn.
As with all the controls, if you leave off the controller for a few seconds the automatic controls will take over - use this if you get terribly lost and don't know which direction you're Boinging in . It's easier to work out "where you are" when you're starting from the centred flower-like construct that the effect prefers when driven with gentle music. Keep your motions gentle, and examine the effect of moving, then pausing to let Boingy wobble about for a bit, then moving again in time to the music.
When you are done playing with that, and satisfied that you have a good idea what Boingy is doing in response to your commands, bring Boingy back so that it's pretty much like a small flower in the middle of the screen again, then turn your attention to the right analog stick. The right stick allows you to inject a rotational dynamic into Boingy's motion. Leave the left stick alone and just move the right stick to the left or right. You should see the Boingy membranes exhibiting a kind of corkscrew rotational motion, the speed of which depends on how far over you hold the right analog stick. This motion originates at the "head end" of the Boingy membrane, and you can vary not only the speed of the rotation, but also the size of the circle around which the rotation occurs. The right analog stick up and down changes the amplitude of the rotation - push Up to open it out so that the circular motion is wider, and push Down to make it narrower.
Play a while with just the right analog stick until you have a feel for imparting the rotational dynamic to Boingy. Then bring everything together and use both sticks - positional on the left, rotational dynamic on the right. As before, play around with moving Boingy then letting it rest and follow its own motion for a while. Get a feel for controlling it in a way that feels right with whatever music you are listening to.
Once you are familiar with that and feel happy with it, let go of the analog sticks altogether and let the autopilot take over actually moving Boingy. There are more controls that affect how Boingy looks, and they belong to the d-pad.
Boingy uses two palette generators to colour itself - the colour of the overall structure is interpolated from the two main palette generators. D-pad left and right steps through one set of colour generators, and D-pad up and down steps through the other set. Let Boingy run on autonatic, and just fiddle with the d-pad, watching how the colours change as you select different generators.
Finally just bring everything together and have a nice play with Boingy using all the commands, changing colour and imparting dynamic as you feel the music warrants. When you're happy with that, we'll move on to Psychedelia.
Navigate to this effect:

- it should be three steps directly Up in the matrix from where we were practicing with Boingy. You should see a pinky-yellowy tunnel, and some stuff happening on the walls of a transparent cube that rotates inside the scene. This "stuff" is Psychedelia and here it is used as a "layer" which is then used to texture the cube. In many effects the likes of Boingy and Psychedelia aren't drawn directly to the final output screen, they are drawn on their own layer, and then that layer is used to create some other part of the final scene - in this example, the Psychedelia layer is used to make the walls of the cube.
Sometimes, in a complex effect, your "layer" may be fairly well "back in the mix", as it were. Here, with the cube, it's fairly obvious where the Psychedelia layer is, and so you'll be able to see immediately what your actions are doing to the overall scene. On other effects Psychedelia or Boingy may be much less obvious - mapped onto the walls of a tunnel, for example, or even used as a displacement map to another, more directly obvious part of the scene. Controller 3 is in some ways one of the trickiest ones to use well, because you need to have a good eye to determine "where you are" in some of the more complex effects and therefore how you can best use your controls to enhance the performance. At the end of this section we'll give you a little test .
For now, it's fairly obvious where the Psychedelia is in this effect - it's in the cube. And the controls for Psychedelia are very similar to those for Boingy, as it turns out. Left analog stick is position - try it now and see. Try using just the x-axis, just the y-axis, and then combining the two. Notice that, unlike Boingy, Psychedelia does not come to a stop if you hold the stick on oen direction; instead it wraps around, allowing you to create a constant motion of the Psychedelia pattern at a direction and speed dependent on how you hold the left analog stick. Play with Psychedelia on the inside of the cube for a while, letting the rest of the effect do its own thing as you do so.
Once you're happy with that, turn your attention to the right analog stick. Once again, pushing the stick left and right imparts a rotational dynamic - in this case, rotating the entire Psychedelia pattern around its centre. Pushing the stick up increases the size of the pattern elements, and pushing it down makes them smaller - hold the stick all the way down and you can "fade out" the Psychedelia later altogether, something you may actually want to do when you feel that the music might like it.
Play with the right stick for a while, and then, as before, bring both sticks together into an orchestrated Psychedelia performance on the inside of that cube.
Once again there are d-pad controls associated with Psychedelia. This time only one colour generator is used, and you change that by Up and Down on the d-pad. You will have noticed in playing with it that the Psychedelia pattern has a certain shape - you can change this fundamental shape by pressing Left and Right on the d-pad.
Play, experiment, get a feel for all of the Psychedelia controls - and then when we're ready we'll move on to one more display element which is frequently assigned to controller 3.
Navigate to this effect:
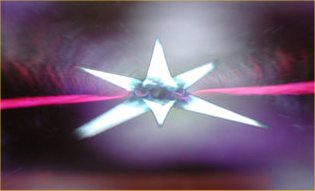
- you should find it just two steps to the left from where we were practicing with Psychedelia. Push the right analog stick up and to the left - what you're looking at there is what we call a "replicator object", for reasons that we won't need to go into until you're using a neon version with the editor and I'm writing a tutorial on how to build your own effects . You'll find various effects around that contain Replicator objects which can be funky-looking like this one, or simpler like those that contain the shattering tauruses you've probably seen in Neon already.
Generally where there isn't also Psychedelia or Boingy in the scene and we have one of these then I'll assign it to controller 3. If there *is* Psychedelia or Boingy it'll get assigned to one of the other controllers, usually 4 or 2. Here it's on 3.
Pushing the right analog stick up and to the left ensures that you're seeing the object clearly - that's because the two functions of the right analog stick are Brightness (stick up/down - hold all the way down to fade the object right out, press all the way up to make it as bright as it can be) and Shatter. Holding the stick left closes the object up so it's all one piece. Holding it to the right causes the object to fly apart into all its little component polygons. Try that a few times. Try making little whooshing noises as it all flies apart into bits. Go on, you know you want to .
The other analog stick simply controls the orientation of the object. Give it a fiddle and you'll find you can spin the object around in what is hopefully a satisfying manner. Go on, twiddle away, and shatter it a few times for good measure .
Tips for controller 3:
- Learn to find yourself. As I mentioned before, sometimes the effects for this controller can be way back in the mix. Learn to identify where you are and what your input will do.
- Use the colour-change d-pad commands to help find yourself if you're having trouble. Spotting which bits of the effect change colour will tell you where and what you are.
- Likewise use the intensity commands on the right analog stick - see what disappears when you press down, and what becomes brighter when you press up. That will also help to place you.
- As ever, use gentle motions for control. You can extract a lot more subtlety from Psychedelia and Boingy if you don't just waggle away like a madman or move stuff at maximum speed all the time. Neon is like a fine woman, and responds well to a gentle touch (but spends much less time thinking about handbags and shoes).
- You don't have to use everything. Sometimes if you're well back in the mix maybe even just colour changes and intensity changes done at the right time impart enough to the scene to be effective.
Exercises for the reader:
Navigate to this effect:

Where's Psychedelia? Find it and use it.
Navigate to this effect:

Where's Boingy? Find it and use it.
Navigate to this effect:
Where's Psychedelia? Find it and use it.
That's it for controller 3 - next up it's Controller 4: Star and Tunnels
More >>>